
Pressure-Testing Your Tech-Integrated Lesson
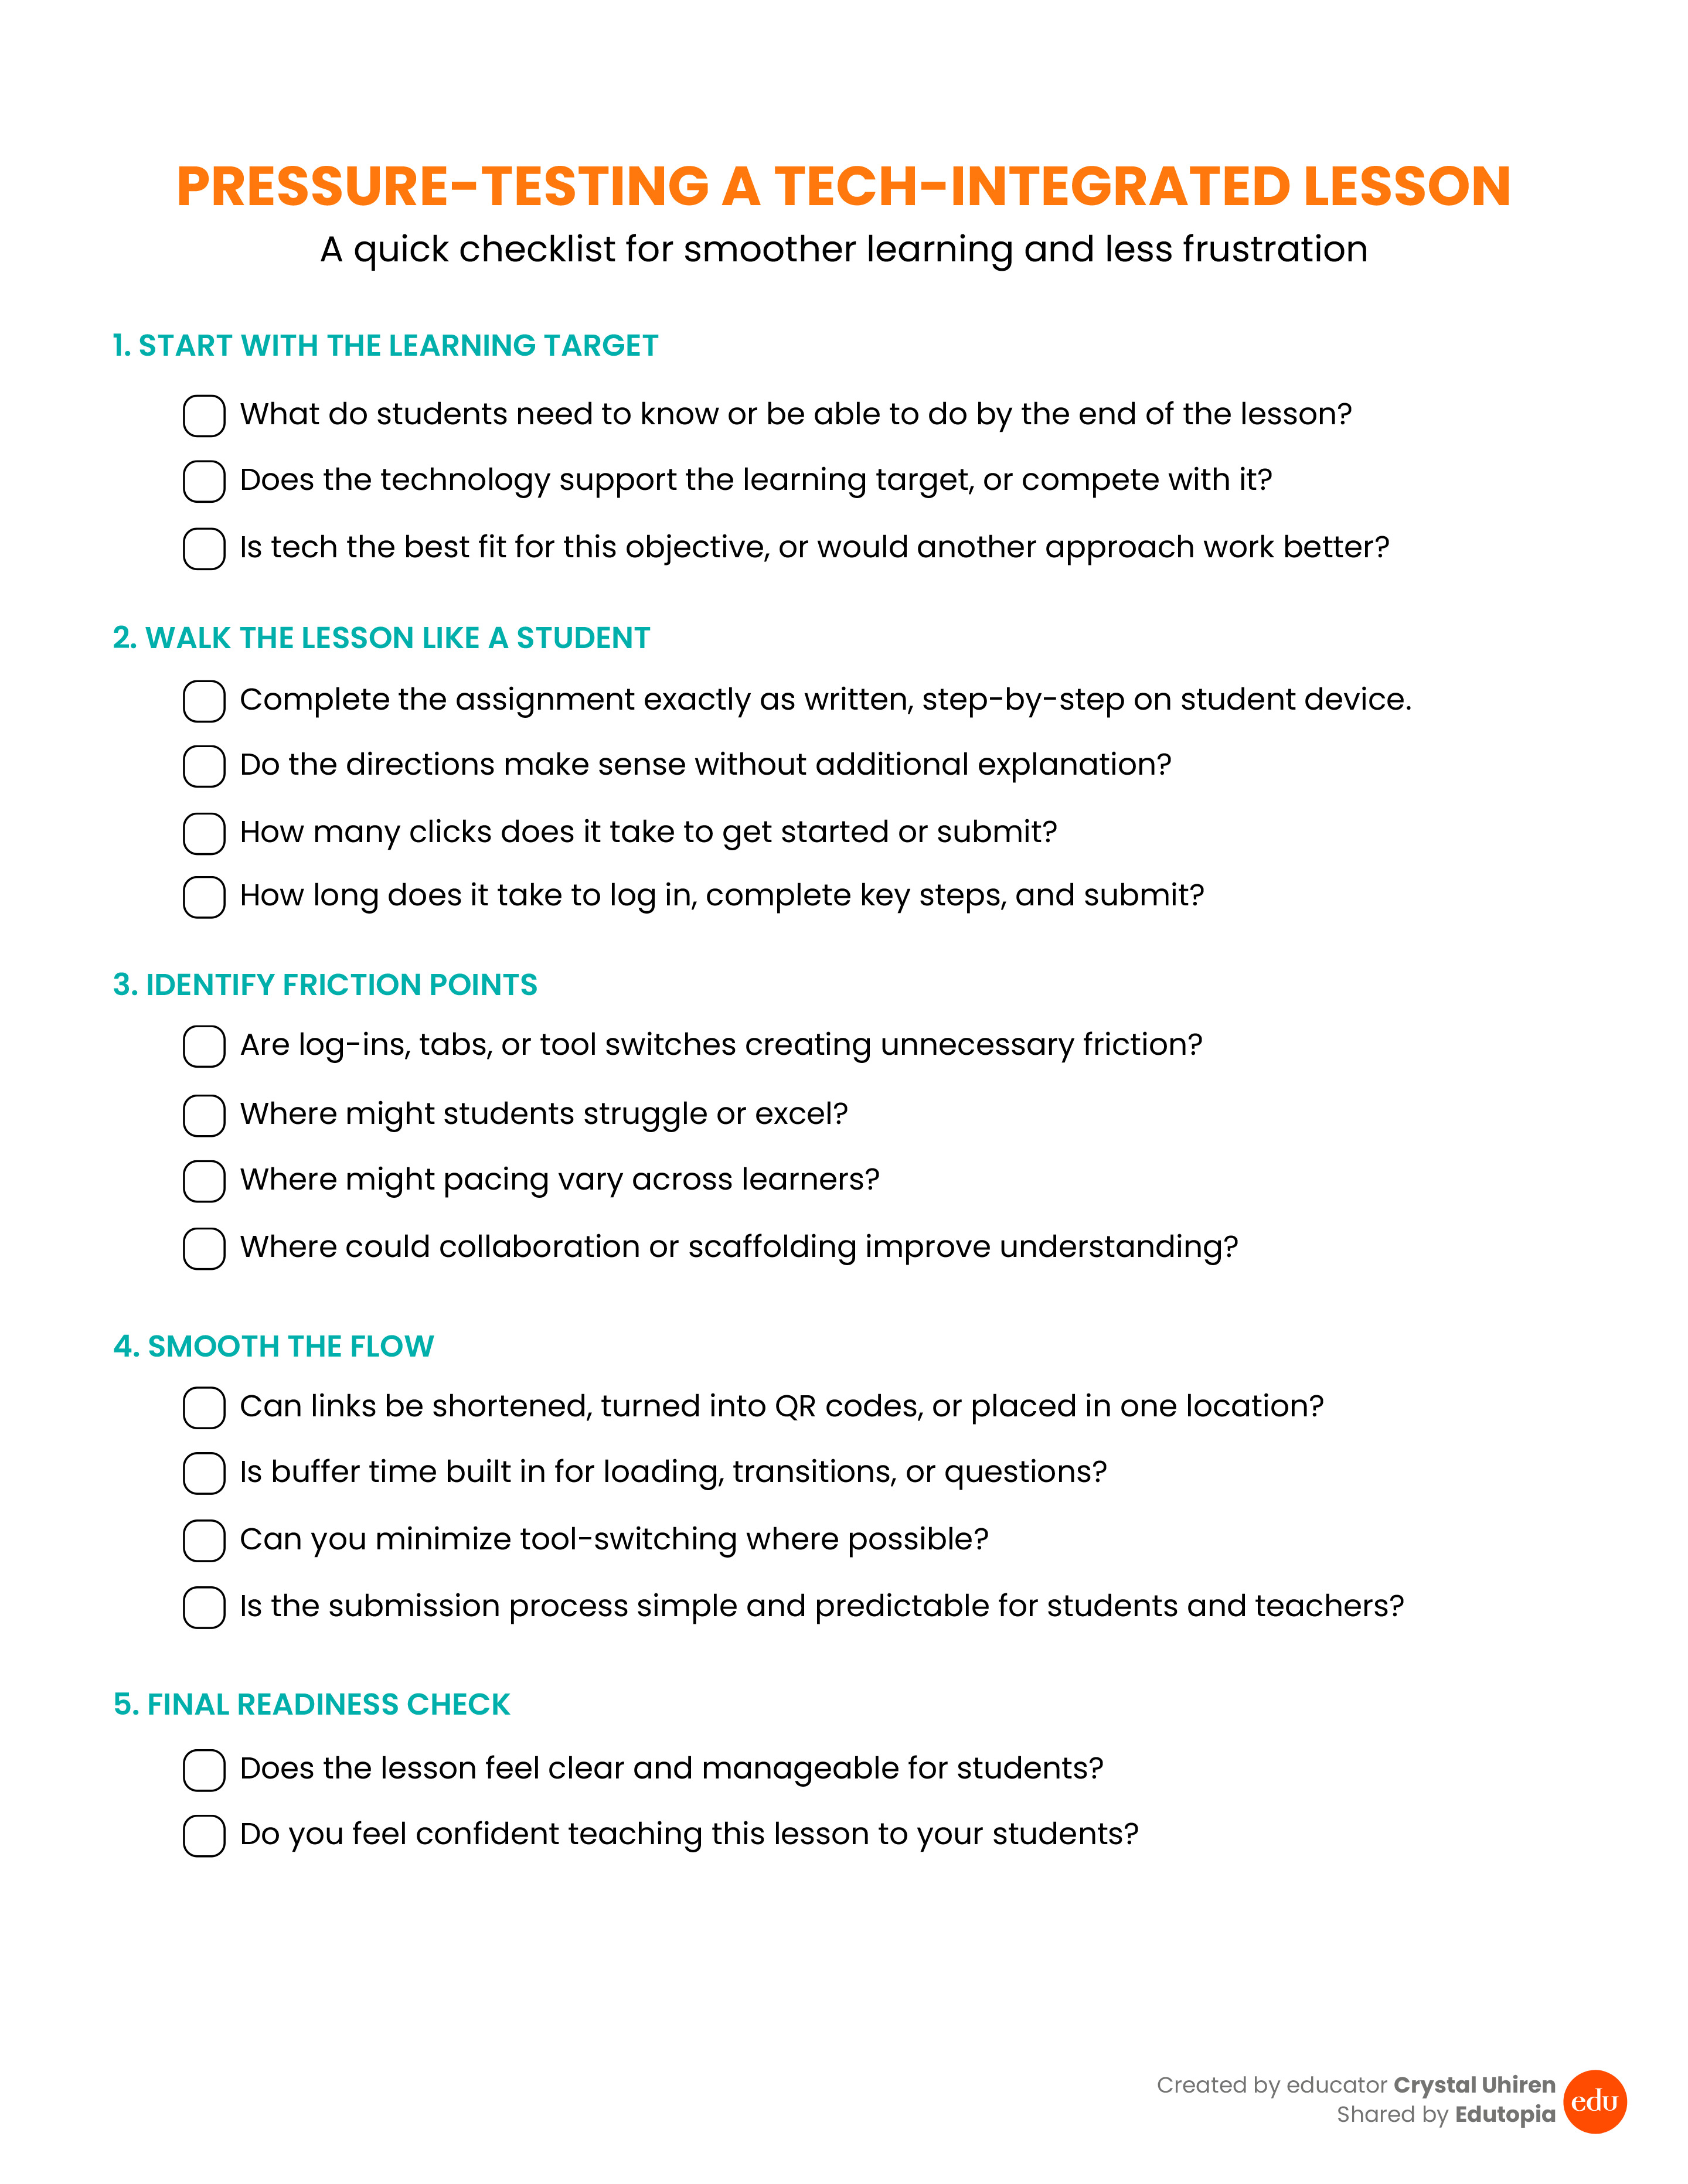
Pressure-testing your lesson first helps catch friction points early and launch with confidence. Download the free checklist to get started.
Your content has been saved!
Go to My Saved Content.We’ve all been there. You have a great lesson mapped out, and you’re ready to teach a concept in an innovative way using the latest edtech. You begin the lesson, and suddenly the technology hits a snag and the first period of the day reveals a handful of issues. Whether it’s a log-in problem, a blocked website, awkward click paths, or unclear directions, it can be deflating to have a lesson derailed. No matter how much we plan or how comfortable we are with technology, pressure-testing is a critically helpful step in protecting valuable learning time.
Why Ensuring That Tech-Based Lessons Work Matters
Pressure-testing is a short, intentional process used before students ever touch the lesson.
The goal isn’t to add one more thing to our teacher to-do list. Small steps—testing an assignment on a student device, assessing directions for clarity, and identifying potential friction points—can make a noticeable difference in how smoothly a lesson runs (as well as how confident we feel when it launches).
To clarify: We do not need to pressure-test every lesson, or even use every strategy I mention below at once. Starting with one upcoming lesson and choosing one small adjustment is often enough to improve the student experience. Over time, these micro-habits create lessons that feel more intentional and less stressful for everyone involved.
When technology works well in the classroom, it fades into the background and allows learning to take center stage. By pressure-testing our lessons before introducing them to our students, we improve instructional flow while honoring students’ time and attention. Our aim isn’t perfection, but rather care, clarity, and durable learning experiences that are built to last.
Start With the Learning Target, Not the Tool
The potential impact edtech can have in the classroom is exciting, but the allure of shiny new tools can distract from actual learning goals. That’s why effective pressure-testing begins with what students need to learn, not the tool.
Ask yourself:
- What do students need to know or be able to do by the end of the lesson?
- Is the technology enhancing the learning target or competing with it?
- Is the tool helping students effectively demonstrate their learning?
If these questions raise concerns, it’s worth considering how technology is being used in the lesson. For example, switching or eliminating platforms can improve lesson flow and reduce the chances of students getting lost. Some tech is inspiring, some is familiar, and some simply isn’t the best fit, and that’s OK. Not every tool belongs in your lesson, and pressure-testing anchored around your learning goals will inform when to say yes or no.
Walk the Lesson Like a Student
One of the most important steps in pressure-testing is walking the lesson like a student, or wearing the student hat. This means completing the assignment exactly as written, step-by-step, before students ever see it. This process provides us with fresh perspective, often revealing vague or unclear instructions, places where reminders are needed mid-task, or points where student momentum might stall.
As you walk the lesson, it helps to do the following:
- Count the clicks. See how many clicks it takes for students to get to the assignment, begin the work, and submit it. If students have to navigate through multiple platforms before they even start, that friction may interrupt momentum.
- Review the log-in process. Notice whether students are logging in once or repeatedly, and whether passwords, authentication steps, or redirects could slow them down or cause confusion.
- Identify what transitions are required. Pay attention to how often students are asked to switch tabs, tools, or apps, and whether those transitions support the task or distract from it.
- Consider the right tools for the task. Will it be completed best with a stylus, or is a keyboard the better tool for the job?
Creating a clear workflow reduces unnecessary decision-making for students. For example, students using writing feedback tools would benefit from a split-screen setup: feedback visible on one side while they revise on the other. This eliminates the friction of toggling back and forth endlessly between screens.
Pressure-Test Directions for Clarity
Walking the lesson also highlights opportunities to improve instructional clarity. Recording a short video walkthrough of an assignment’s directions allows everyone to preview and revisit the instructions in a familiar voice. This is especially valuable for English language learners and students with disabilities—who may struggle with text-based directions—while also supporting absent students.
Additionally, consider testing written directions with a generative AI tool to check for clarity, or reworking them into simplified bullet points or a student checklist.
Try this prompt:
You are acting as a [grade level] student who is seeing this assignment for the first time. Review the directions below and check them for clarity, missing steps, and potential points of confusion.
First, identify:
- Any steps that may be unclear to a student
- Any assumptions the teacher may be making about prior knowledge
- Any places where students might get stuck or feel unsure of what to do next
Then, rewrite the directions as:
- A clear, student-friendly checklist
- Short, sequential steps written in simple language
- No more than one action per step
Keep the academic rigor the same. Do not simplify the task itself, only the directions. Before starting, ask any questions required to ensure accurate completion of the task.
Here are the assignment directions: [Paste directions here]
Identify Friction Before It Becomes a Problem
As you walk the lesson, keep an eye out for friction points. These often manifest as student confusion, which can look like disengagement or behavioral issues. Anticipating where students may struggle allows for proactive planning.
- Where might collaboration improve understanding?
- Where might scaffolding be needed?
- How might pacing vary across learners?
Thinking through these questions helps identify opportunities for differentiated supports and design adjustments that improve lesson flow.
Test on a Student Device and Time the Experience
Frequently overlooked, don’t forget to pressure-test while using a student device. Experiencing the lesson on a Chromebook or iPad (rather than your teacher device) can be eye-opening. Creating a screen recording of the click path for opening, completing, and submitting an assignment helps refine instructions and identify hesitation points. These recordings can also be used as a class demo. If recording is not possible, watching a trusted student walk through a click-heavy portion of the lesson can serve the same purpose.
It can also be helpful to grab a phone and start a timer, tracking how long it takes to log in, open the assignment, complete key steps, and submit the work. This step often reveals pacing issues that are easy to miss during planning. What feels quick to us can take longer for students themselves, especially if devices load slowly or multiple transitions are required. Seeing the actual time it takes allows us to plan more efficiently, build in appropriate buffers, and avoid rushed endings or incomplete submissions.
Smooth the Flow Without Lowering the Bar
With those friction points in mind, the next step is smoothing the flow without lowering the bar. Our aim isn’t to make the lesson easier, but rather to remove obstacles that don’t belong in the learning process. In many cases, we may even identify how the bar can be raised.
Keep an eye toward:
- Quick refinements, like turning long links into QR codes or shortened URLs.
- Pre-linking materials in one place using a tool like Padlet.
- Choosing tools that reduce unnecessary switching. For example, tools like Canva, Google Drawings, or PowerPoint often provide more flexibility and efficiency than a traditional word processing document.
- Smoothing the submission process can also make a noticeable difference. Large file uploads or video submissions can interrupt momentum, so using tools with built-in uploading or recording features like Padlet helps keep student work in one centralized location for easier review and grading.