
An Unconventional Seating Plan Designed to Benefit Focus and Learning
After years of search and experimentation, this teacher finally hit on a room layout that allowed for efficient shifting between whole class, small group, and independent work.
Your content has been saved!
Go to My Saved Content.I used to be an obsessive classroom rearranger—every six weeks or so I would find myself looking for a new desk arrangement that would improve some aspect of our work in the room. So when I finally found a desk arrangement that I didn’t want to change for the rest of the year, I knew I was on to something good.
The idea started developing when I stumbled across an article about an Australian classroom arrangement based on three “archetypal learning spaces”: campfires, caves, and watering holes. Essentially, the idea is that students need a physical space to work independently (a cave), spaces to gather informally (campfires), and a space to gather as a whole to learn from an expert (the watering hole). Research on flexible seating has shown promise, but for many educators at the secondary level, creating this type of environment often runs into issues of space and cost. When I had 34 desks in a classroom that was around 35 feet by 30 feet, making those desks fit was my priority, not creating different zones around the room.
This is why I started playing with having students move their seats and desks to suit different tasks. We would practice with timers to go from rows to table groups and then back, but no matter how much we practiced, moving still always seemed to be more of a disruption than it was worth.
What I really wanted was to have students make small, quick moves so that shifting wouldn’t take up the whole period, and the solution I created looked far from normal, judging by the look I got when my administrator walked into my classroom one day and found the students facing away from me toward the outer walls. Before I explain, here’s a quick diagram of the classroom design that made my classroom function so much better.
Essentially, I had a sort of horseshoe shape around the outside of the room, with a smaller horseshoe inside it (with gaps to facilitate movement). In the middle were a couple of tables, and then pressed against the front wall of the room were two more tables. (If you don’t currently have tables, check with your custodians. They often know where the secret stashes are.) Now, my room wasn’t very big, so to make space for an extra table, I ended up getting rid of my teacher desk. If that’s not an option for you, there are still ways to make it work.
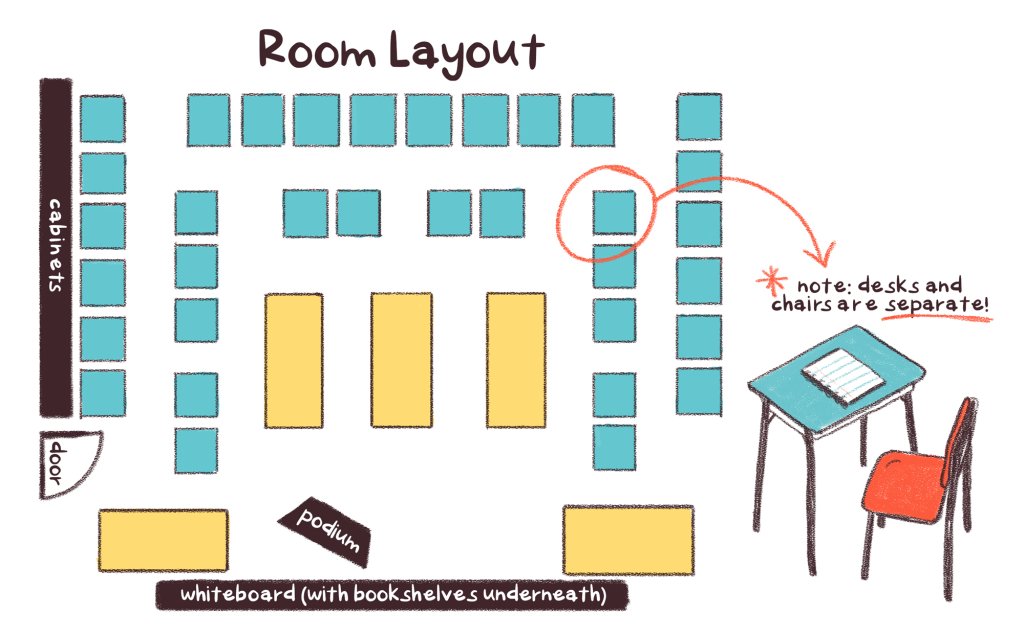
It’s also important to note that my students have chairs that are separate from the desks—if you have the one-piece desk-and-chair combo, this won’t work for you.
Instead of rearranging the room depending on the type of activity, I was able to keep the furniture the same with this layout and just have students move, depending on what we needed for a specific activity.
Independent Work: Caves
Individual work, in the Australian layout I mentioned, happens in “caves,” and students need minimal distractions to support focus. As an English teacher, I found the cave setup to be great for things like independent reading time or any sort of writing time. It also worked well for formal assessments.
The way it worked was that students would face out at the two horseshoes. It would look like this—and as I mentioned, the first time an admin walked in and saw it, they were initially baffled.
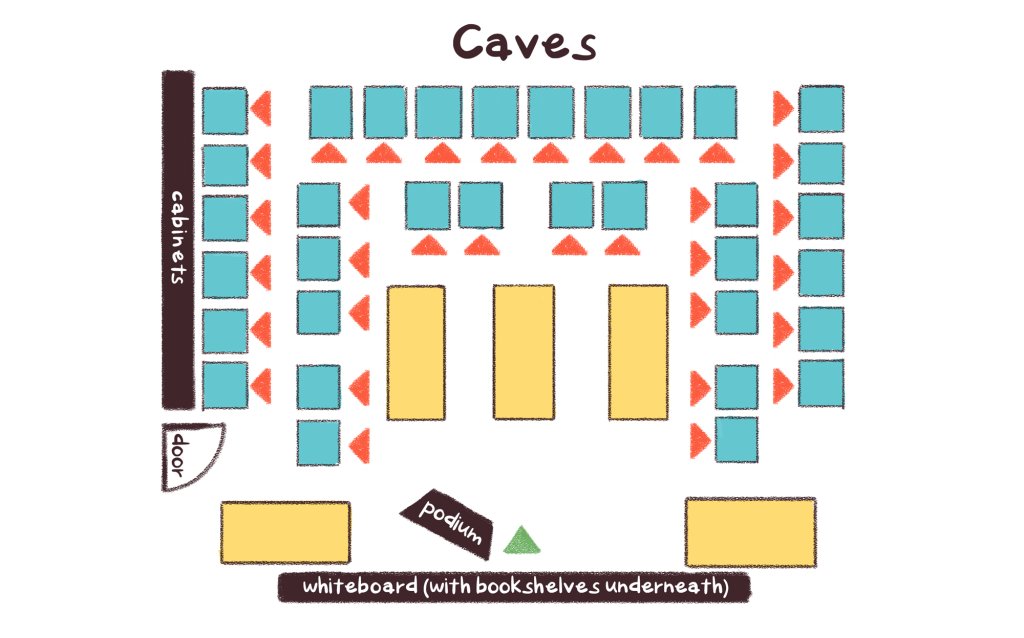
As you can see, each student had their own desk but was facing outward. One benefit of orienting students this way in the digital age is that you are able to see their screens at a quick glance if they are working on computers. It’s also easy to see if they are attempting to hide a phone behind a screen or in a book.
That’s great from a classroom management standpoint, but one of the biggest benefits I found was that this layout not only minimized distractions but also acted as a physical cue to the students about the type of activity we were engaged in.
This was why I had struggled with permanent desk groups—I loved how they facilitated conversations, but when it was time to work independently, students were still grouped in a way that could be distracting.
From the cave, switching to the watering hole was incredibly easy.
Whole Class Instruction: The Watering Hole
Watering holes are intended to be a place for everyone to come together. This works really well for things like mini-lessons, videos, and watching student presentations.
Here’s what the watering hole looked like.
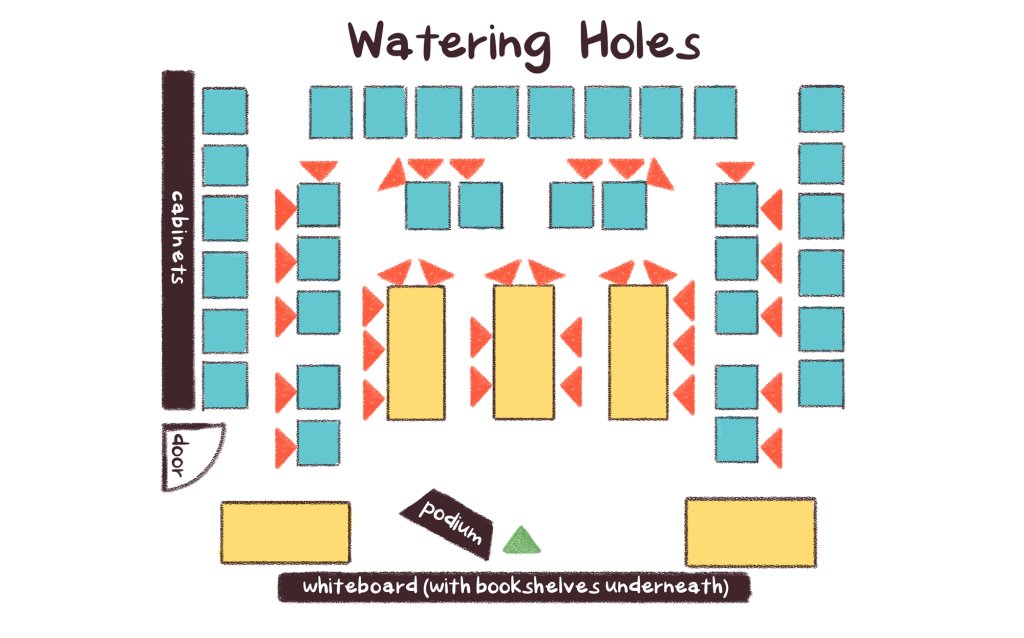
Instead of needing to move their desks to see the front of the room, most students just needed to spin around in their chairs. The outer row would use the inside horseshoe as their tables, and the inner horseshoe would flip around to the center tables.
There were a couple of things I really liked about the switch from caves to watering holes. For one, I would typically have students leave their devices on their original desks when they turned around, so the screen was no longer a distraction for them. And two, because of the way the room was laid out, when we all rotated in for the watering hole setup, we got closer together, which allowed me to use proximity a bit more for classroom management.
Small Group Work: Campfires
Finally, the campfire is the place for collaboration and connection, so this setup is intended to help facilitate small group work. This is how that would typically look in this layout.
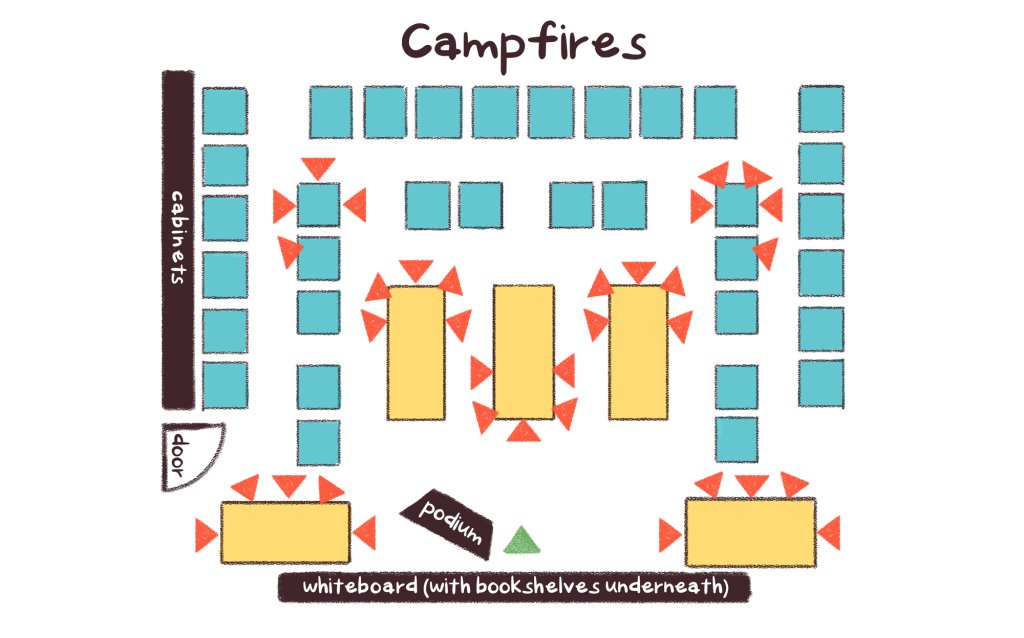
I would often number the different stations in the room, and students would be assigned a number and move to that spot. While I would try to have an extra chair or two at the stations, often students would have to bring their chair with them.
So with just a quick shift of some chairs—and no change to the desk positions—we could transition quickly from independent work to whole group activities to small groups with minimal disruption and have clear physical cues to support the expectations of each space.
Maximum Flexibility
I really liked the way this design facilitated less-formal seating needs. For example, if I needed to conference with students or engage in some small group tutoring during independent work time, it was easy to do that at the tables, and with most students facing outward, the layout created a little bit of privacy for those interactions.
Additionally, students knew that they were allowed to move to the tables during independent work time if they needed to collaborate with a peer, as long as they checked with me. This collaboration would happen close to the middle of the room and out of sight of the other students, which allowed me to monitor things and minimize the distraction to those still working independently.
Overall, my goal was to ensure that the physical layout of the room facilitated the type of learning experience we were engaged in, and I found that the quick physical transitions helped students also transition mentally to each activity.